How to Use Custom CSS on Your Squarespace Site
I’m a Squarespace designer and I love the platform, but I also know the importance of using Custom CSS when designing Squarespace sites. This is how you get out of the “Squarespace box” and into truly custom design backed up a user-friendly platform.
But if you’ve ever had to make changes to a website that includes custom CSS, it can be a little daunting unless you’re familiar with how it all works and where to find what you’re looking for. Each designer might have a slightly different method for adding code to a Squarespace website (because the platform doesn’t make it easy to create an external file), but there are three places where you can add CSS to your site.
How I use Custom CSS
I use Custom CSS during my Website Design VIP Day to give your website a totally unique design that fits your brand and doesn’t feel like a boring template. Even with the new Fluid Engine update from Squarespace, Custom CSS is vital to creating a design that looks great on every device and gives you those little extra touches that build trust and converts leads.
Learn more about my Website Design VIP Day and apply now to launch your new website in just 1 day.

Where to Add CSS and Why
Whether you’re adding CSS to your own website, making edits for a client, or trying to change the existing CSS in a template, you need to know where you can add CSS and why you might choose each method.
I’m sharing these methods in the order that I prefer to use them. I’ve found that many other designers follow these same steps, so it’s a good bet that yours does too.
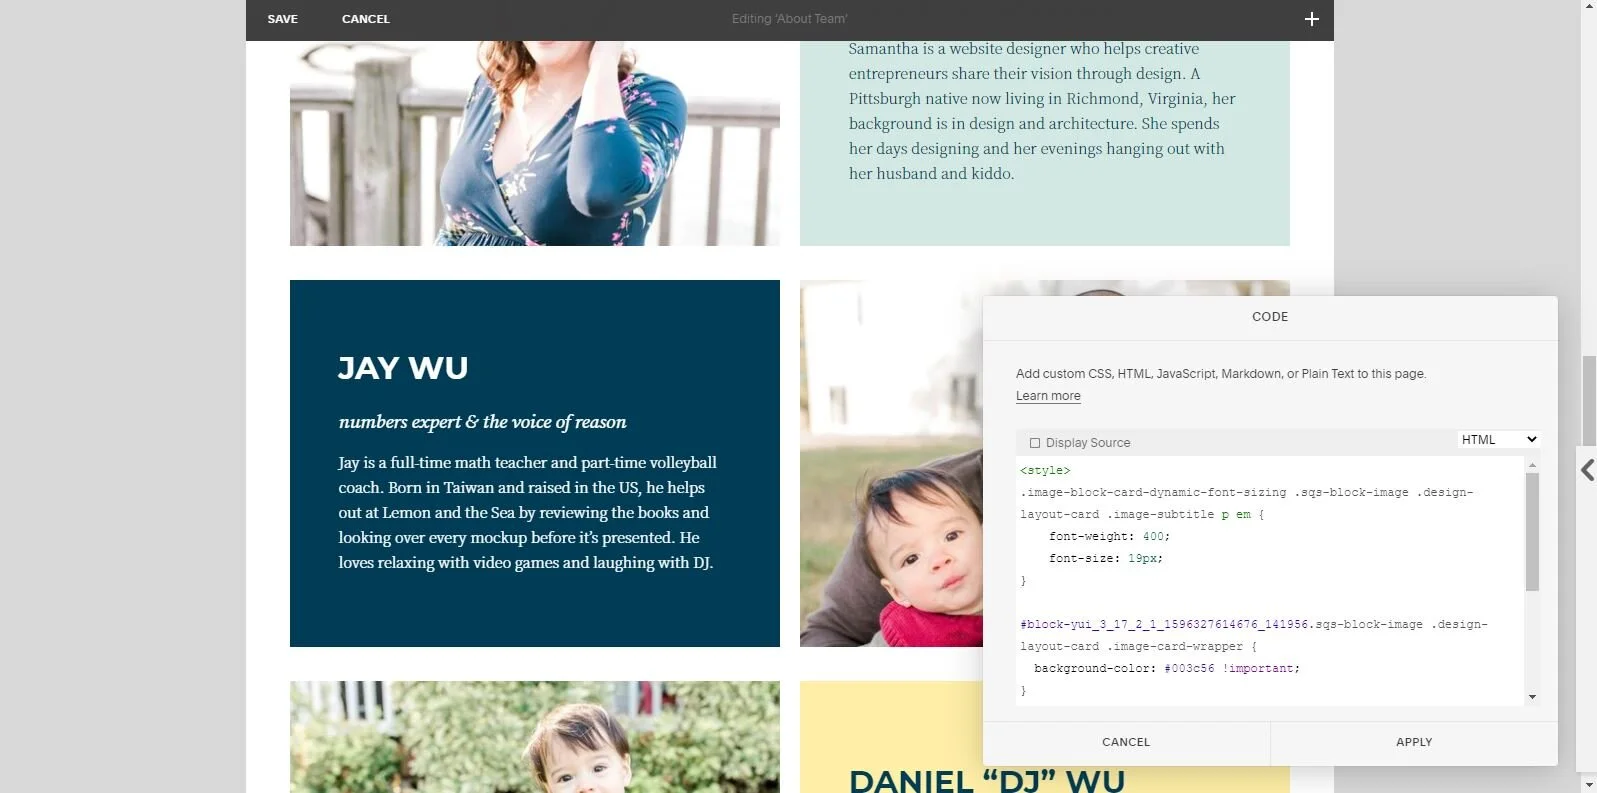
The Custom CSS Panel
This is the most common place to add CSS and it’s where most tutorials will guide you to - and there’s a good reason. The Custom CSS panel is designed to host any CSS changes you want to make to a site, which means that it’s easy to do without any extra steps.
The Custom CSS panel affects the entire site, so any changes you make here will affect every page of your website (unless you tell it otherwise, as described in this post). Because this is the go-to place, Squarespace has already set it up to read CSS (no extra tags to add) and it allows the most flexibility in labeling your code for later reference.

To add CSS here:
Go to Design > Custom CSS
Add in your CSS
As long as the page you’re currently viewing has the elements referenced in the CSS code, you’ll see the changes automatically and can work in real-time without having to save and refresh.
The Code Block
When you have a complicated code to add or are targeting a specific section of a page, you can use the Code Block to add CSS right next to the elements you’re adjusting. I use this method when I’m making complex changes to only one page or section because then it’s right at my fingertips if I ever need to edit it.
To add CSS here:
Go to the page you want to edit
Edit the section you’re working on
Add a Squarespace Code Block
Add <style> tags and your CSS
Squarespace only know what kind of code you’re using if you tell it, so you will need to add Style tags before and after your CSS. It will look like this:
<style> YOUR CSS HERE </style>Occasionally, this method won’t work exactly as expected and not every change you’re making will be visible. If that happens, I recommend going through the code to find out what’s not working and then add another set of Style tags around it.
The Page Header Code Injection
This is the method I use least often for most clients (I’ll talk about an exception below) because it can be cumbersome and generally isn’t necessary. By adding CSS to the Page Header Code Injection area, you’re affecting the entire page, but not the whole site. Generally, I use this if I want to make it more difficult for people to see the code I’ve written.
The other reason I’ll add CSS here is if a website has a lot of pages that require Custom CSS, but I don’t want to affect every page. For example, I have a client who uses accordion menus on multiple sales pages. Some of these include different color accordions and others do not - I include the CSS in the Page Header Code Injection because it affects only the page I’m working on (and is quite lengthy).
The other reason I use this area is for clients who have a very custom mobile design where we’re hiding blocks on desktop and mobile for many different elements. It’s easier to place all that CSS here instead of scrolling through hundreds of lines of CSS in the Custom CSS panel when updates are needed.

To add CSS here:
Go to the page you want to edit
Open the page Settings and go the the Advanced tab
Add <style> tags and your CSS in the “Page Header Code Injection” area
If you’re adding CSS to an Index page using this method, it will all go in the section for the overall Index, not the individual section.
Organizing Your CSS
If you use a lot of Custom CSS like I do, it’s important to keep it organized. You never know when you’ll need to make changes because you want a different color, need to use the code on another page, or something stops working.
The biggest part of staying organized is labeling your CSS as thoroughly as possible. I like to include information about the page, section, and specific block for each piece of code.
My CSS generally looks like this for overall changes (I’m changing the font size of Header 1 when it’s set to bold):
//h1 Boldh1 strong { font-size: 60px; font-style: normal; line-height: 1.4em !important;}For CSS regarding a specific page, I will set it up like this:
//HOME CSS//Home Banner#home-banner .Index-page-image { width: 100%; height: 75%; top: 0%; left:0%;}When editing a specific block (or multiple blocks with the same changes), I'll include a description of the block I’m editing:
//ABOUT CSS//About Instagram Instagram Block#block-yui_3_17_2_1_1603815101583_39310 { padding: 0px !important; margin-bottom: 0px !important; margin-top: 0px !important;}A Note about Labeling
Squarespace can be picky about the way you label your CSS. You’ll notice that in all the examples above, I start my labels with a double slash (//Label Here). This works fine in the Custom CSS panel, but doesn’t always work in the other locations.
If you’re writing CSS and it doesn’t appear to be working, try removing the labels and see if they are causing the issue. I’ve found that this format works better in the Code Block and Page Header Code Injection panels:
/*Label Here*/
A Quick Tip
No matter where I’m going to place the final Custom CSS code on my Squarespace site, I always like to write it in the Custom CSS panel. This allows me to see changes the fastest - without having to save and refresh. If I’m not leaving it there, I’ll copy the final code and paste it into the correct location and double-check that it still works.
If you want to find examples of CSS you can use on your own Squarespace website, check out these posts.
Ready to transform your website?
When you’re ready to transform your website into a welcoming design that builds trust and converts your right-fit leads into clients, my Website Design VIP Day is the perfect way to update your website without it taking weeks or months to launch.
During my Website Design VIP Day, I’ll create a custom design that reflects your brand and is ready to launch in just 8 hours.