Styling Squarespace Forms
Squarespace is a great website platform for many creative entrepreneurs and business owners because of all of the built-in functionality. One of the best functions is the ability to add a Form with a variety of fields, connect it to an email address or newsletter, and then let it do it’s thing.
While other platforms have to use plugins or need to be extensively tested, Squarespace’s forms are easy to set up and simple to use. There is one down-side, though - there isn’t much you can customize.

One of the first Custom CSS changes I learned as a Squarespace designer was styling Forms. Because while they work great, the default styling doesn’t fit many brands and Squarespace’s Style settings don’t allow you to make changes to the Forms.
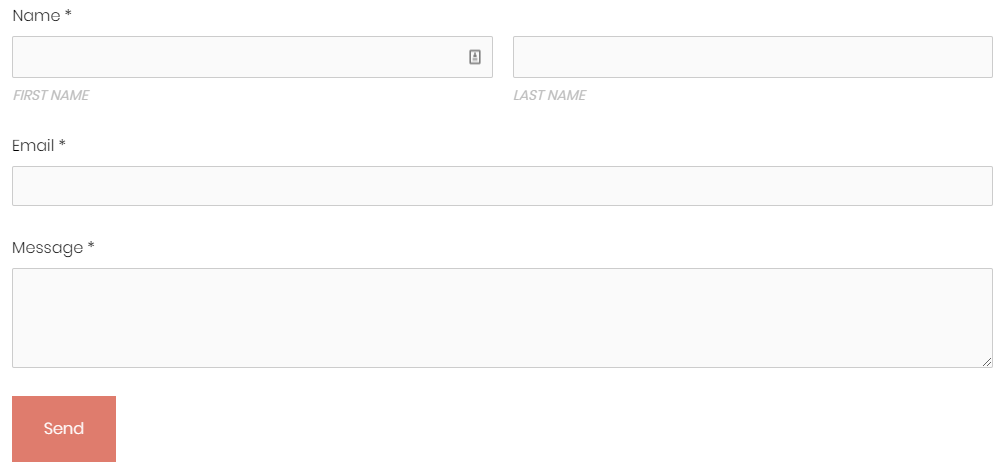
The default form
The default form in Squarespace is simple - it inherits the font and button color from your Styles, but everything else is gray and pretty basic. It works well for simple website that need to get up a running quickly, but doesn’t give you much to work with.

Basic Form Styling
If you want to change up the look of your forms, you’ll need to add some Custom CSS. There are two ways to do this:
1. Add the CSS to the Custom CSS section under the Design menu. This will apply to all the forms on your website.

2. Add the CSS to the Advanced > Header Code Injection section of your page settings. You’ll need to be on a Business or Commerce plan to do this unless your website was created a while ago. This will only affect the form(s) on this page.

Once you know which forms you want to update (site-wide or just one page), you can pick and choose which CSS to include from the code sections below.
Form Fields
This targets the from fields or the sections where someone types.
.form-wrapper .field-list .field .field-element {
   background-color: #cdedec;
   border: 1px solid #59C4C0;
   }
Background-color is the color inside the border box. Since this is the color someone will type on top of, you want it to be light enough to read text over.
Border affects how you want the outline to look. You can change the weight of the border (1px) by changing the pixel number, the type of border (solid) by choosing another type, and the color (#59c4c0).
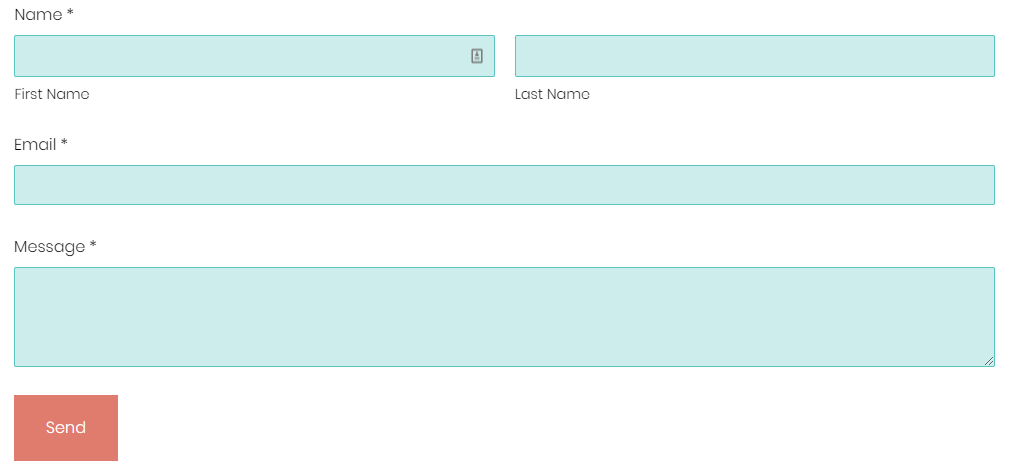
Form Titles
The titles of a form at the names of each field. This can be changed by editting the form fields themselves in the Forms settings. If you want to change how those titles looks, you can use this code:
.sqs-block-form .field-list .title {
    font-family: Georgia;
    font-weight: 300 !important;
    font-style: normal;
    letter-spacing: 0em;
    text-transform: none;
    line-height:1.8em;
    font-size: 16px !important;
    color: #5d5d5d;
    }
Font-family is the font you want for the titles. By default, this matches the Paragraph font of your website, but you can change it to any font that’s available on Squarespace.
Font-weight is how bold you want the font to be. I recommend playing around with this to see what looks best. The number will range from 300-700.
Font-style can be either normal, bold, or italic.
Letter-spacing is how far apart the letters are. You probably won’t need to change this as the default is usually fine, but it is an option.
Text-transform can be none, uppercase, lowercase or capitalize. None means that the text appears exactly as typed in the Form settings. Uppercase means that all the letters are uppercase. Lowercase means that everything is lowercase. Capitalize will make the first letter of each word capital.
Line-height affects how far apart text is when sitting in two different lines. Again, you probably won’t need to change this as the default is usually fine, but it is an option.
Font-size is exactly what it sounds like - the size of the font.
Color is the color of the font. By default, this is the color of the Paragraph text on your website, but you can change it to whatever works best for your brand.

Form Captions
The captions of a form at the text that appears under a form field. Not every field will have these and you can add, remove or change them in the Form settings.names of each field. If you want to change how those captions looks, you can use this code:
.sqs-block-form .field-list .caption {
    font-family: Poppins;
    font-weight: 400 !important;
    font-style: italic;
    letter-spacing: 0em;
    text-transform: uppercase;
    line-height:1.8em;
    font-size: 14px !important;
    color: #bdbdbd;
    }
Font-family is the font you want for the titles. By default, this matches the Paragraph font of your website, but you can change it to any font that’s available on Squarespace.
Font-weight is how bold you want the font to be. I recommend playing around with this to see what looks best. The number will range from 300-700.
Font-style can be either normal, bold, or italic.
Letter-spacing is how far apart the letters are. You probably won’t need to change this as the default is usually fine, but it is an option.
Text-transform can be none, uppercase, lowercase or capitalize. None means that the text appears exactly as typed in the Form settings. Uppercase means that all the letters are uppercase. Lowercase means that everything is lowercase. Capitalize will make the first letter of each word capital.
Line-height affects how far apart text is when sitting in two different lines. Again, you probably won’t need to change this as the default is usually fine, but it is an option.
Font-size is exactly what it sounds like - the size of the font.
Color is the color of the font. By default, this is the color of the Paragraph text on your website, but you can change it to whatever works best for your brand.
Submit Button
The form’s Submit buttons will pull it’s color and font from the Style settings, but won’t necessarily match the other buttons on your website. Often, these buttons have more padding around them. You can change this with this code:
.sqs-block-form .sqs-editable-button {
    font-family: Poppins;
    font-weight: 300;
    font-style: normal;
    letter-spacing: 0em;
    text-transform: none;
    line-height: 1.8em;
    padding: 10px 25px !important;
    font-size: 1rem !important;
    color: white;
    background-color: #59c4c0 !important;
}
Font-family is the font you want for the titles. By default, this matches the Paragraph font of your website, but you can change it to any font that’s available on Squarespace.
Font-weight is how bold you want the font to be. I recommend playing around with this to see what looks best. The number will range from 300-700.
Font-style can be either normal, bold, or italic.
Letter-spacing is how far apart the letters are. You probably won’t need to change this as the default is usually fine, but it is an option.
Text-transform can be none, uppercase, lowercase or capitalize. None means that the text appears exactly as typed in the Form settings. Uppercase means that all the letters are uppercase. Lowercase means that everything is lowercase. Capitalize will make the first letter of each word capital.
Line-height affects how far apart text is when sitting in two different lines. Again, you probably won’t need to change this as the default is usually fine, but it is an option.
Padding is how much space is around the text.
Font-size is exactly what it sounds like - the size of the font.
Color is the color of the font. By default, this is the color of the Paragraph text on your website, but you can change it to whatever works best for your brand.
Background-color is the color of the button itself.
To learn more about button styling, check out this post.

There are even more ways to customize your Squarespace forms, but they take more advanced CSS and Javascript. I’m working on a post about those options, including customizing some of the different form fields (like the date picker, radio buttons, etc.) and placing fields next to one another.